Half Hull Model
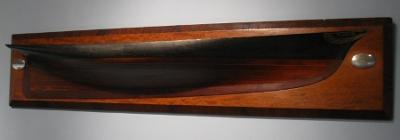
Building a half hull model is one of the best approaches to scratch building model boats. They are relatively easy to construct, inexpensive, and look beautiful hanging on the wall!
Half hull models were originally made as a tool by ship yards. There were several purposes, both technical and for marketing and communication. Often several models were made. At the completion of the full-size ship, the yard often kept one and the customer got one as well.
Many yacht clubs the world over established cultures where the members got to hang the half hull model of their priced yacht on the wall in the club house. This became a popular opportunity to boast and gain notoriety and status at the club. Over time these models were often willed or donated to the club. One of the world's most famous collection is that of the "Model Room" at the New York Yacht Club in NYC.

|
The half hull model becomes the "master" from which plans often were drawn up. Herreshoff, the famous American yacht designer, apparently designed all his boats this way.
Other times experienced designers make the half model first, as a reassurance that the lines "feel" right in three dimensions, before material and labor is committed for the full size ship.
When the building of large ship hulls were transitioning from being made mostly of wood to iron, and later steel, a half model was often made to lay out the plate development and rivet pattern.
Later, half hull models gained a role mainly as a promotional tool for ship builders, and a source for self indulgence among yacht owners. A good example of the latter, is the hall of half models at the New York Yacht Club mentioned earler.
To make a half hull model, I can think of at least three different approaches as outlined below.
- Solid block: This method is essentially the same as described for building a model boat hull from a solid block of wood.
- Hawk's nest: is akin to half of a plank-on-bulkhead hull. Usually most of the planking is left out with the exception of the wales, cap rails etc. To high-light the lines of the ship, a few planks are laid along the hull. Typically less is more here.
- Bread-and-Butter: The method for making a half-hull is not that different from making an entire hull. Making only one side obviously is easier - no symmetry issues to contend with.
Most of the work is described on this Bread-and-Butter hull construction page. As described on that page, the hull is built on the buttocks (boards laminated vertically). Building on the waterlines is more common, and looks better for half-hull models. The method is largely the same though.
Bread-and-Butter on the Waterline
B&B on the waterline is the most common, so that's what I'll focus on.
Transferring the lines from the plans to the wood may not be all that intuitive, and I'm sure there is more than one way to do it. Here is how I'd do it:
Copy and enlarge the hull sections and stem and stern profile (showing at least one station), of the plan to the scale you are building the model to. The sections need to be to the outside of planking to be true. Otherwise you'll need to compensate for plank thickness. I won't go into that further.
Use the Design Waterline (DWL) as the horizontal datum.
Draw horizontal lines parallel to the DWL at a distance equal to your lumber thickness. Draw lines until there are no more sections to intersect. The space between the lines now represent each of your boards.
Turn your attention to the lumber. At least one long edge needs to be straight. This will be the center-line of the hull. Mark the station locations with pencil. Extend the marks into lines on one flat surface and down the straight side. Mark or number the stations as per the drawing.
Number the boards so you can keep track of which one corresponds to what location on your sections drawing.
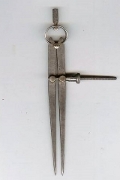
Use a pair of Machinist's Dividers (see picture), to transfer the width of each station to the corresponding location on the correct board. Continue until all stations on all boards are covered. Also mark the ends of each particular board. This dimension is taken from the enlarged/copied hull profiles.

|
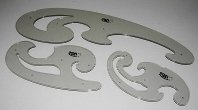
Using a set of French curves, a batten or other useful device, connect the points on subsequent stations for each board until you have recreated the desired waterline on each particular board. Gross irregularities are a sure sign you missed and set a measurement on the wrong station. As long as you redo before you cut you'll be OK.
 |
Cut out waterline outlines with a jigsaw or on a band saw. I typically leave 1-2mm of wood outside the line I created.
Glue up the stack making sure you maintain alignment between the boards. Sometimes it is necessary to drill and dowel - your call.
Let dry and carve. See the Bread-and-Butter pages (links above) for more information.
Displaying Your Half Hull Model
I can imagine half hull models remain so popular because they are great for display hanging on a wall. Unlike any other form of model boats, most homes could easily harbor dozens of these.
The two most common ways to display them are:
Mounted on a board
The board is often a nice slab of hardwood with an intricately routed edge. If you don't have a router, some fancy molding from your local woodworking store will work well.
Hanging with simple eye-bolts
A much more casual appearance for sure, but just as effective. The eye-bolts are typically mounted from the top (or deck, as it were), close to the center line.


