Painting Waterline
by Barry
(UK)

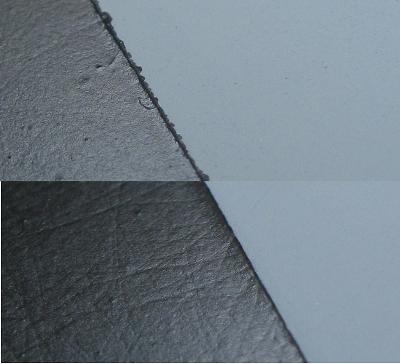
Here is a sample that I used for an A-B test of the two paint techniques. I spray-painted it with a solid coat of paint - automotive filler primer is what I had available for the test.
I am building my first RC tug, the Bugsier 3. I have marked the waterline and sprayed the red below the waterline, that is fine and I have hand-painted the first coat of black on the topside. I intend to spray the remaining coats. How do I get a perfect line, masking tape just does not do it.
This is something I've been struggling with until very recently. The problem wit masking tape is that, no matter how careful you are, paint always seems to creep in under the tape in places. The result is a jagged edge. It looks amateurish.
This had annoyed me for a while and I was trying packing tape thinking the smooth tape would seal out the paint better. It didn't work.
I also tried the masking tape and painstakingly scraped the bled paint with a scalpel. It took for ever and the result was a little better, but still well under my standards.
A few years ago I heard of a new technique going back to the regular masking tape. I can't remember where this came from originally, but it is simply brilliant. Here is how you do it:
- Clean and prep the surface as you normally would.
- Paint the lighter of the two colors first. Let the paint over-spray well into the are where the second color will go (this too is nothing new)
- Mask the waterline with regular masking tape. Cover the rest of the model with newspaper or cut up plastic bags and seal up to protect from over-spray.
- Use gravity to your advantage: place the hull such that gravity will help pull paint away from the masking tape joint.
- Spray a coat of paint of the same color as the first coat right on the masking tape joint. This coat will be the one that seeps under the tape. Since it is the exact same color as the previous coat it will be virtually invisible. Make sure the tape joint is covered entirely and sealed with paint. Let it dry.
- Now spray the actual color this area is supposed to have.
- Let dry to the touch and unmask carefully.
In the picture series above you can see a quick A-B test I did with, and without, this technique. The result in the last picture simply blew my mind.
For anyone trying this, I recommend you do your own A-B test to get the technique down. It's simply amazing.
Best of luck!
Comments for Painting Waterline
|
||
|
||
|
||
|
||


