Planking HMS Bounty's Jolly Boat
by John Ward
(Glasgow, Scotland)

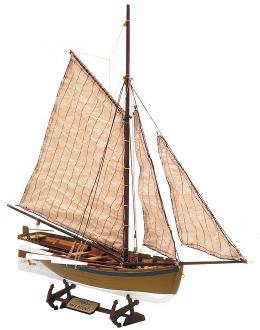
Bounty's Jolly Boat by Artesia Latina
Building the HMS Jolly Boat. Very first build. I am trying hard to plank the hull. Impossible to get the planks to bend and stay in place. Nails not holding it, even with a little glue applied as well. How can I manage this?
When I first got this question I wasn't sure if you were scratch-building or building from a kit. With a little research I figured it must be the kit by Artesia Latina.
To be fair, I have not built this kit, nor any other kit by this company. Having done a little research online, I quickly found you're not the only one having difficulty with this step of the kit.
Kit manufacturers in this price range has a reputation of sacrificing ease of assembly for the benefit of lowering cost. The belief is that it helps sales. Personally, I think this mentality is thievery and they are shooting themselves in the foot in the end.
Another clue that the hull will give grief is the box-art. It clearly shows the model with a painted hull. The folks at Artesia were more than likely struggling with this step themselves.
First Problem: The Planks.
I'm generally a strong proponent of using a single layer of planks, as this kit does. Many kits are built with a double layer of planking.
The benefit with double planking is that the planks are half as thick and bend that much easier. For whatever reason Artesia decided to give this kit a single layer of planks.
In your case I'd stick with a single layer of planking. However, I'd replace the strips that came with the kit with something thinner. You may have to experiment, but I'd try 1/16" Basswood (Linden or Lime-wood in your neck of the woods).
Another thing I've noticed folks struggle with when strip-planking model boats, is the shape of the planks.
Planks with the proper shape are also easier to bend - especially towards the extremes. The downside is that narrower planks have less real-estate to accept nails.
There are many books about model boat planking. Most deal with larger and more complex ships than what you're building, but the info can be adapted. A few that comes to mind are:
- Planking the Built-up Ship Model by Model Shipways Inc.
- The Built-up Ship Model by Charles G. Davis (a Dover Books Classic)
- Boatbuilding by Howard I. Chapelle (this is for full-size boat building, but a really good book for a basic understanding of the construction and process even for building model boats)
The boards that make up the planking on a real round-bilged wooden boat are never rectangular. In fact, they rarely have even one straight edge.
Instead, every board taper off towards the ends. The books listed above all address this and how to go about figuring out the shape of the planks.
This is probably one of the most difficult steps in building model boats, but it is great practice.
Second Problem: The Nails
I strongly dislike metal nails. In fact I don't use them. They are out-of-scale, make the wood split and cuts up your fingers when you try to sand the finished hull.
The solution is using trunnels (sometimes treenail or trenail). Essentially wooden dowels in place of the nails. Full-size boats has been built with trunnels since ancient times.
To make trunnels you need:
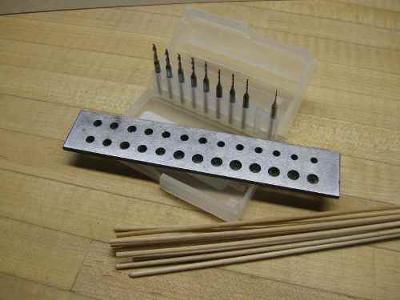
- Small hardwood dowels - birch, maple are good. Bamboo skewers work well too. Popsicle sticks split into rectangular strips can also be used.
- A Jeweler's draw plate. It doesn't need to be fancy or exotic. I paid $10 for mine many years ago. You could make your own. I've heard of people using thread gauges or just about anything made of metal with a hole through it.
- A pair of needle-nose pliers.
To make the trunnel - first taper the end of the wood slightly and feed it through the largest hole that will accept it on the draw plate.
It goes into the narrow end of the hole and out the wide. This way the edge will be cutting the access wood off as you pull the trunnel strip through with the pliers.
Successively use smaller and smaller holes until the trunnels are the size you need. For the Jolly Boat, I'm thinking 0.5 to 1.0 mm diameter would work well.
Don't cut them to length. Use the whole strip and trim each as you go. I'd drill the holes into each frame to a depth at least 4-5 times the thickness of the planks you are using.
To use them, you need a pin vise and a small drill. I bought carbide drill before I knew better. I'd go with standard High Speed Steel drills.
The holes need to be slightly smaller than the trunnel to give it the grip you're after. It may vary with the wood you use. I'd experiment.
Before you start you need to prep the keelson and frames. They need to be glued up and sanded to take down any sharp corners the planks otherwise would touch. Also, a common mistake is to leave the stem section (prior to planking) blunt. To take the planking it needs to be sanded to almost a knife's edge.
The wood strips/boards has to be pre-shaped and dry-fitted.
Third Problem: Glue
I'm not sure if I understand the comment about the glue correctly, but there is some confusion about glue, so I may as well point out a few things.
By all means, use glue. Not to glue the nails I hope, but nails or not - the glue will do the heaviest lifting in almost any model boat venture.
The glue should be applied between the planking and the frames, on the trunnels and between any given plank and it's closest neighbor.
To assemble, I'd use PVA glue and work from the stern and move forward. You need to finish each board in one sitting, or else the planking won't look right. The PVA glue should give you plenty of time.
Take turns laying a board on port/starboard to avoid twist in the hull as you progress.
This answer is most certainly not the last word on model hull planking, but it should cover the basics.
Best of luck with your Jolly Boat!
P.S.
I highly recommend reading the books listed above. Some may be out of print, but I'm sure there are others that I don't know about.
For anyone who happens to read this: Any other book recommendations on this subject are welcome. Just add a comment.
Comments for Planking HMS Bounty's Jolly Boat
|
||
|
||
|
||
|
||
|
||
|
||
|
||


